Quick Start
This guide helps you get setup as quickly as possible. It doesn't go too deep into the concepts, but necessary links have been added so you can read more about things that might sound a bit confusing. All the configuration steps listed below can be accessed directly on the Setup Page.
By the end, you should have:
- Connected, at least, one of your support channels.
- Added your knowledge and operations library.
- Put basic escalation processes in place.
- Tested and Validated Jardine before taking it live.
Before You Start
You need:
- Admin access to your Jardine dashboard.
- One channel to start with: Intercom, Zendesk, or Shared Inbox Email.
- Product and policy docs your team already trusts.
# Import your knowledge and operations library
This is the step that involves you bringing everything you have about your product into Jardine. To clarify things early, Jardine has two types of libraries:
- Knowledge Library: Information about your product, and everything Jardine needs to know.
- Operations Library: Information about how your support team operate, including Policy documents, billing resolution tactics, etc.
They both share the same concepts of Collections and Documents. Currently, we support Google Drive links, File Uploads, and Text as methods of adding Documents in your collections.
- Create a Collection: Collections are a way for you to group your documents into different segments so Jardine can easily locate them based on a customer's needs. The same principles apply for both Operations and Knowledge Libraries.
- Add Documents: A document usually represent a topic, idea, or concept. These are not hard rules, they just help Jardine be of better help to your team when you structure them that way, so that you can reduce ambiguity.
- Test early in Playground: Before you launch your Jardine into your system, you get to test things properly and be sure that it understands your product and operations dynamics.
# Connect one channel
You probably already run your support operations through Intercom, Zendesk, or Email. This step explains how you get Jardine to listen for incoming tickets on those platforms (we call them Channels).
-
Go to Setup -> Channels. You'll see the list of currently supported channels. Click your desired one, and follow the on-screen instructions.
-
Intercom and Zendesk are OAuth based connections. After completing the on-screen instructions, a webhook URL will be generated for you. Copy the webhook URL and add it to your app in either Intercom or Zendesk (depending on which one you just connected).
-
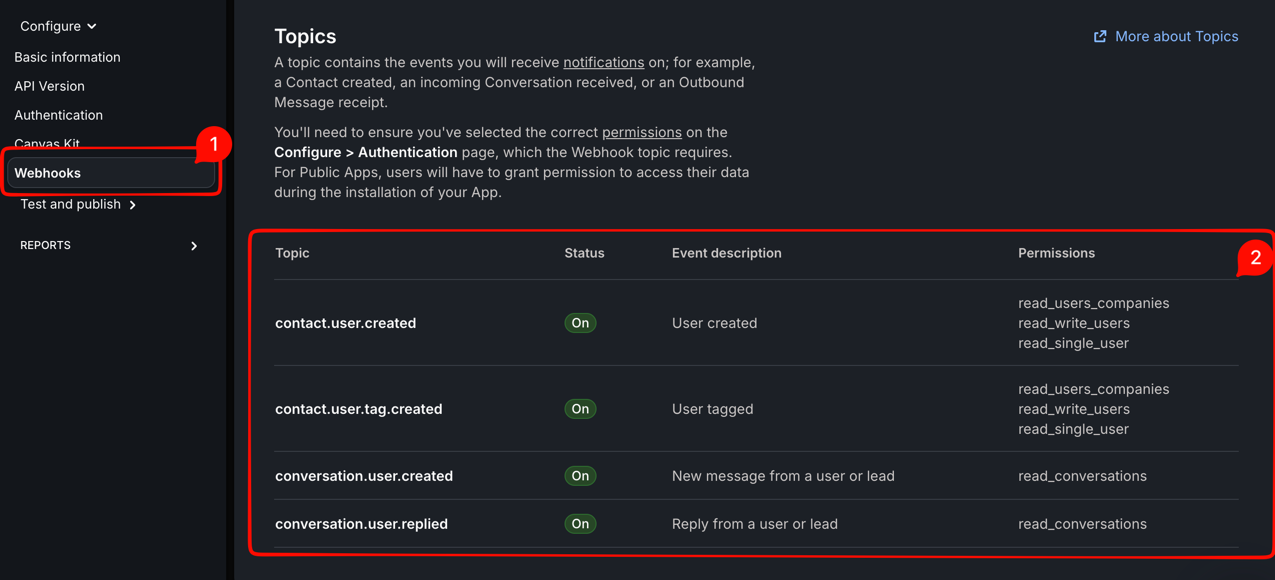
For Intercom, follow the instructions here on how to create your app on intercom, and how to add a Webhook URL. Below are the events you'll need to listen for when configuring your webhook for Intercom.
-
For Zendesk, follow these official guides to configure your webhook and trigger rules:
- Creating webhooks to interact with third-party systems
- Creating triggers for automatic ticket updates and notifications
- Ticket trigger conditions and actions reference
Zendesk trigger setup
After creating the webhook in Zendesk, create two ticket triggers so Jardine receives only customer-authored public messages.
How to create each trigger in Zendesk
- Open Admin Center.
- Go to Objects and rules -> Business rules -> Triggers.
- Click Add trigger (Ticket triggers).
- Add the conditions and action shown below.
- Save and make sure the trigger is Active.
Trigger A: New customer ticket
- ALL conditions
Ticket | Is | CreatedComment | Is | PublicCurrent user | Is | (end user)- Action
Notify by | Active webhook | [Your Jardine webhook]
Trigger B: Customer reply on an existing ticket
- ALL conditions
Ticket | Is | UpdatedComment | Is | PublicCurrent user | Is | (end user)- Action
Notify by | Active webhook | [Your Jardine webhook]
This setup ensures Jardine is notified for new tickets and customer follow-up replies, while ignoring internal notes and agent-only updates.
-
For Email Inbox, all you have to do is add your email domain. Once the domain is added, some DNS credentials will be generated for you which you have to configure from your domain provider.
-
After you've connected one channel and subscribed to the right events (in the case of Intercom and Zendesk), you should confirm that messages appear in Conversations.
# Set routing rules
Routing Rules allows you to set boundaries for Jardine. There are some tickets you don't want Jardine to respond to, which you probably want it to escalate to Slack, Discord, or Webhook. Sometimes, you just want Jardine to hand that ticket over cleanly to human. Routing is where you get to do that.
-
Open Routing.
-
Add a small set of tags, destinations, and rules.
What are Tags, Destinations, and Rules?
Whenever a ticket arrives in your Inbox, it usually fall under a topic that is peculiar to you and your team (e.g Billing Refund, Bug Report, Order misplacement, etc.). That's exactly what tags represent.
When a ticket arrives, Jardine first determines what this ticket is about, and then checks the list of tags you've already defined. Once there's a matching tag, that "ticket" will be attached to that tag. If none was found, it'll attach it to the default tag (which was already created for you when you created your account) Rules are "What Jardine should do when a ticket matches a tag". Do you want to escalate? Do you want it to hand-over to human? etc. Destinations are escalation "ports" whereby, if you decide you want a ticket to be escalated if it matches a tag, you set that destination as "where" you want the escalation message to be sent to.
-
Watch it go live!
# Add connectors only if needed
Data Connectors are information banks for Jardine. Sometimes, Jardine would want to know certain things about a customer's account which is available in your database or stripe. You can connect your "information banks" to Jardine so that responses are more accurate, and investagtions are deeper. Data connectors are completely read-only, Jardine cannot modify your data, it only reads what you've given it permission to read.
If answers depend on live account data, add a connector in Data Connectors.
# Launch safely
After connecting your Channels to Jardine, Jardine would not automatically start replying to every message that comes in. You have to toggle some settings that allows Jardine to respond or not.
- Start with
Generate AI Drafts. It allows Jardine to actually draft responses, but don't actually send it, which is useful for cases where you want to see how Jardine handles actual scenarios. - Enable
Auto-send AI Replies. It allows Jardine to actually respond, not just draft.
Done Checklist
You are ready when your team can answer:
- Which channel is live?
- Which cases escalate, and where?
Next: Setup Guide.